Why I made Image to Brick

A few weeks ago, I was cruising the Reddit procrastination superhighway when I stumbled upon Legoizer, a web application to convert uploaded images to a mosaic constructed out of LEGO bricks. It’s such a simple and beautiful idea that I was surprised to find out that it took some long for someone to finally build it. After playing around with it, I decided that I really wanted to recreate the Great Wave off Kanagawa in LEGO. But before I do that, there were a few limitations of Legoizer I had to overcome.
Therefore, I set out to create my own LEGO mosaic generator with the options I need. The result, Image to Brick, can be seen at www.tobrick.com.
Missing Features
There are five major reasons why I found it necessary to build my own tool as the first step to recreating the Great Wave instead of working with Legoizer.
Feature 1: Color Selection
The first reason is the lack of color selection. Legoizer uses any available LEGO colors it deems necessary to match the given image as closely as possible, which means that it often uses bricks with colors that do not exist in the source picture in order to achieve dithering effects. While this is a reasonable thing to do when the source image is a photo or painting with obvious gradients, this can lead to weird results when the source image has distinct solid colors, such as in the case of a logo. For example, we can see this in a comparison using the LEGO logo:


We see the Legoizer result on the left and the Image to Brick result on the right. Legoizer did a better job of preserving the smooth edges and the overall shape but it has to to aggressive anti-aliasing performed using bricks with odd colors such as Bright Yellowish Green. Image to Brick on the other hand allows the user to predefine five colors for the image: White, Black, Bright Red, Bright Yellow and Dark Stone Grey. This leads to much more intuitive results and the increased aliasing can be compensated by adjusting the mosaic size.

I felt that reducing/limiting the number of colors use both decreases the complexity of the build process and also results in more LEGO-y results and therefore implemented a selectable color palette in Image to Brick.
Feature 2: Brick Selection
The second missing feature is brick selection. This is less mission critical than color selection, but it proved to be really handy in dealing with situations where it may be difficult to acquire bricks of certain lengths. This is important if you actually want to build the mosaic.

Feature 3: Dimensions
Another feature that proved to be really useful when planning a LEGO mosaic is to have control over the exact size of the output in number of bricks. Legoizer did not provide this option and appears to consistently produce results of a fixed size for images above a certain resolution. I added this to Image to Brick and it is really nice to be able to adjust the height of the output incrementally to get the right balance between size (i.e. cost) and image fidelity.

Feature 4: Orientiation
Legoizer produces fix-sized results meant for bricks stacked on top of each other. This is not desirable for me because I prefer to have the studs of the bricks/plates facing the viewer in order to create a more interesting texture. You cannot just take instructions meant by a stacking build and use it for a top-down build because the a single unit of LEGO is square on the top and rectangular on the side and this needs to be taken into account when the algorithm generates the instruction.

For example, a square image converted to a mosaic of height 20 bricks will, in order to preserve its existing square shape, have a width of 20 bricks in top-down mode but 24 bricks in stacking mode because the width of a stacked brick is smaller than its height.
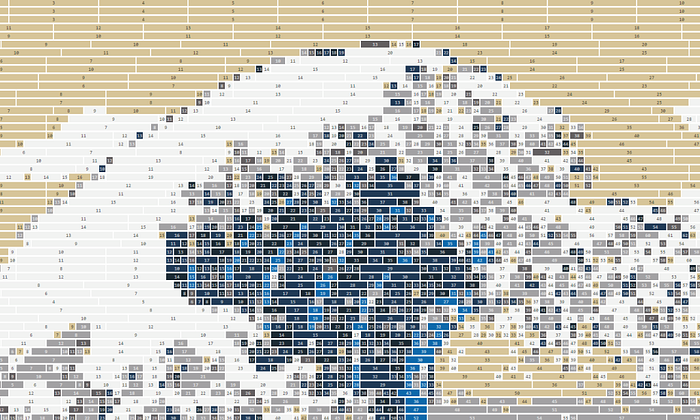
Feature 5: High-level instruction view
The last feature I need is a good high level view of the entire instruction output. Image to Brick’s generated instruction gives both line-by-line details while simultaneously achieving a good overview of the final mosaic. From having previously helped out on a similar project, I realized that having neighboring lines visualized next to each other was really essential to the building process. It is easy to get lost in the middle of a line and looking at the previous line helps to provide a point of reference.
Conclusion
Coding up Image to Brick was not too bad thanks to DitherJS and the React framework. With the above five features, I now have the tool I need to build The Great Wave off Kanagawa just the way I want it. If you are interested in helping me make that happen, check out my Kickstarter campaign.